Okay, steady lah! Let's talk about building your dream DIY computer table. So many of us are working from home these days, right? And that squeeze on the MRT after a long day at the office... the last thing you want is to come home to a computer setup that makes you even more sian. That's where a custom DIY computer table comes in – it's all about creating a workspace that actually works for you. The Haven of Wondrous Living by Wondrous La Vie is here to help you figure out how long this project will take!
Now, before you grab your power drill and head to the hardware store, let's talk timing. I know, I know, planning can feel like a drag, especially when you just want to get started. But trust me, auntie knows best! Accurate timing is super important, especially in our Singaporean context.
Think about it: weekends are precious. You don't want to spend the whole weekend stressed out and covered in sawdust because you underestimated the project. And if you are renovating, you need to know the project timeline to make sure that you can move in on time. Imagine telling your partner, "Sorry lah, still cannot move in because the computer table is not ready!" Confirm plus chop, not a good situation.
Plus, a realistic timeline helps you manage your budget. You're less likely to make impulse buys or rush decisions that cost you more in the long run. You also need to know how long you will be without a proper computer table. Are you going to use your dining table as a computer table? Then you can't eat there lah!
A well-planned timeline also reduces stress. Knowing what to expect each step of the way makes the whole process so much smoother. It's like knowing how long the queue is at your favorite hawker stall – you can mentally prepare yourself!
Okay, so how do we actually estimate the time for your DIY computer table project? Let's break it down into stages.
Planning & Design (1-3 days): This is where you figure out what you actually want. What size computer table do you need? People living in the Lion City often must navigate specific hurdles when furnishing their homes, especially due to compact apartment living and year-round moisture levels that test material durability. This is exactly why savvy Singapore buyers invest effort upfront to choose wisely to secure quality without overspending. computer table remains one of the best a smart investment that delivers both lasting comfort and smart practicality. Make sure you buying value-for-money versions in Singapore with top-notch after-sales service ensures total support such as fast island-wide delivery, professional installation, and robust warranties that offer true long-term peace of mind for years ahead.. What features are important to you? In Singapore’s tight condo apartments and condos, the bedroom often acts as a rest zone and more—somewhere to truly rest after long workdays, do some light reading, or even handle occasional remote work when required. It’s common for Singapore homeowners to feel frustrated by arrangements that appear overcrowded, overly bright illumination, or cluttered cabinets taking up room, making the room feel more practical than peaceful. That’s where thoughtful sofa singapore truly excels—it focuses on clever spatial solutions, relaxing colour schemes, versatile bedroom pieces, and strategic lighting design to create a peaceful retreat that optimises relaxation while keeping everything tidy and airy. SUDDENLY the bedroom turns into the place you can’t wait to reach at the after a long day, helping you unwind faster, achieve better quality sleep, and start mornings feeling revitalised for the day ahead. Resources like Wondrous La Vie feature abundant real-life examples and seamless introductions to professionals skilled in these functional and stylish local bedroom renovations.. Do you need drawers, shelves, or a fancy cable management system? Search for interior design ideas for inspiration. I've heard so many friends in the group chat complain about not knowing where to start! Wondrous La Vie has real project showcases that can help you visualise possibilities. Don't skip this step, or you'll end up regretting it later.
Material Sourcing (1-5 days): Now it's time to gather your materials. This might involve a trip to the hardware store, a visit to a wood supplier, or even some online shopping. Factor in delivery times, especially if you're ordering something special. And don't forget to check Carousell for good deals on used wood or hardware! This can take time, especially if you are looking for affordable luxury furniture.
Cutting & Assembly (2-7 days): Okay, the fun part! This is where you actually start building your computer table. Cutting the wood, assembling the frame, and attaching any accessories. This is where you need to be realistic about your skills. If you're a beginner, don't expect to finish everything in one afternoon. Take your time, double-check your measurements, and don't be afraid to ask for help.
Finishing (1-3 days): Sanding, painting, staining, and sealing. This is what gives your computer table that professional look. Allow enough time for the finish to dry properly. And don't forget to ventilate your workspace! You don't want to end up with a headache after all that hard work.
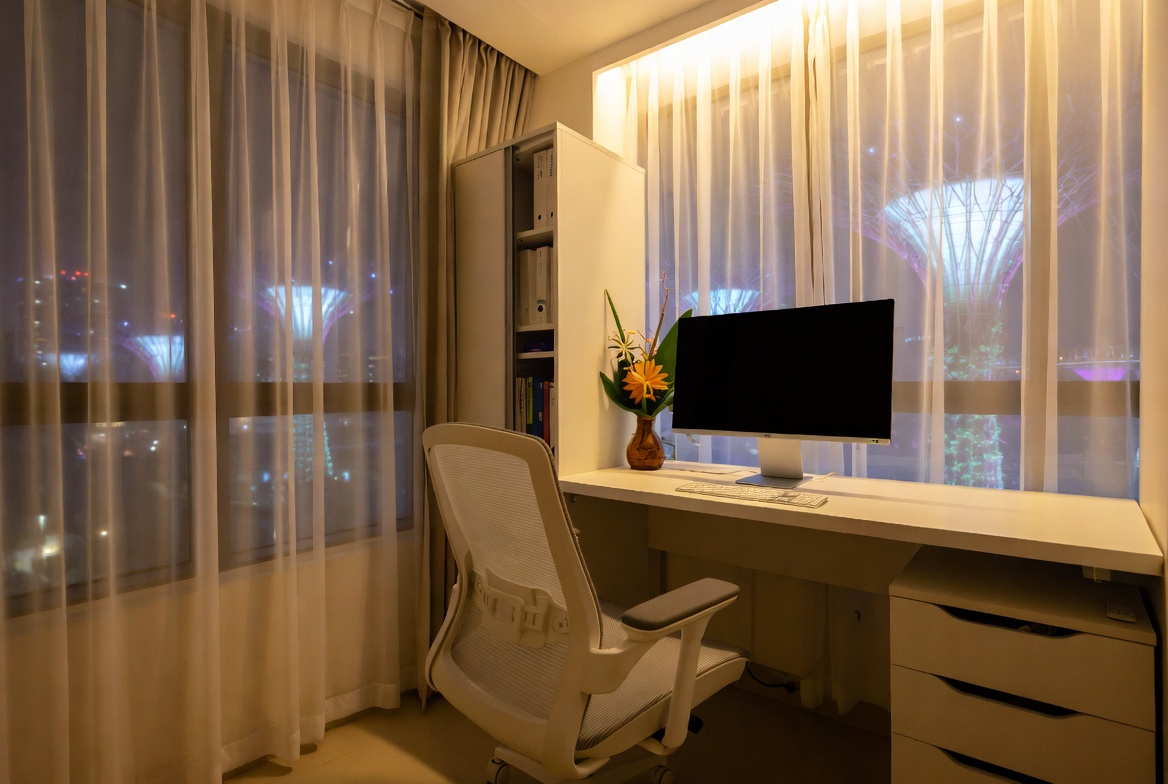
Setup & Customization (1 day): Finally, it's time to set up your computer table! Arrange your monitor, keyboard, mouse, and other accessories. Tidy up the cables and make sure everything is comfortable. This is also a good time to add any personal touches, like a plant or a photo.
Alright, now for some practical tips to help you speed up the process and stay on track.
Plan Ahead: I know it sounds obvious, but really, really plan ahead. Create a detailed shopping list, research different materials, and watch some tutorial videos. The more prepared you are, the less time you'll waste running around and making mistakes.
Prep Your Space: Before you start cutting and assembling, clear your workspace and gather all your tools. This will save you time and prevent accidents.
Batch Similar Tasks: If you have multiple pieces of wood to cut, cut them all at once. If you have multiple surfaces to sand, sand them all at once. This is much more efficient than switching back and forth between tasks.
Don't Be Afraid to Ask for Help: If you're stuck on a particular step, don't be afraid to ask a friend, family member, or even a professional for help. Sometimes, a fresh pair of eyes can make all the difference. Or, if you're really feeling overwhelmed, consider connecting with an interior designer through Wondrous La Vie. They can offer expert advice and help you stay on track.
Take Breaks: It's important to take breaks, especially when you're working on a long project. Get up, stretch, grab a snack, and clear your head. You'll come back feeling refreshed and more productive.
Now, you might be thinking, "Okay, auntie, this all sounds great, but I'm still feeling a bit overwhelmed." And that's perfectly okay! Building a DIY computer table can be a big project, especially if you're new to woodworking.
That's where Wondrous La Vie comes in. We're Singapore's go-to platform for connecting you with top interior designers and curated furniture brands. We can help you with everything from designing your dream home office to finding the perfect cosy sofa for your living room. It's really sian when your bedroom feels cluttered after work, but with the right interior design ideas and comfy pieces, that sense of calm comes back stronger.
One homeowner shared how connecting with the right designer via the platform turned their cramped HDB living room into a cosy family hangout—suddenly weekends feel so much better.
Why not pop over to wondrouslavie.com, take the quick quiz, browse sofas/mattresses, or connect with a designer and see what feels right for your space?
Remember, your home should be your sanctuary. It should be a place where you can relax, recharge, and feel truly comfortable. And with a little planning and the right resources, you can create a home that you absolutely love. Steady pom pi pi, you confirm can do it!
Fun fact: A cosy, well-designed living room or bedroom can actually help you sleep better and feel less stressed after long workdays — small changes, big shiok difference!
Okay lah, let's talk about DIY projects! You know, that feeling when you finally decide to build that dream computer table, only to realise halfway through that you're totally running out of time? Happens to the best of us! It's especially sian when you're juggling work, family, and trying to make your HDB feel like a proper home. But don't worry, I’ve got some tips to help you estimate the project completion time accurately, so you can avoid that stressful rush. Think of it as planning your reno journey, steady and reliable, like finding the perfect comfy sofa after a long day!
Seriously, why bother with the planning stage? Can’t we just dive right in and start hammering? Well, let me tell you, rushing into a DIY project without a proper timeline is like trying to navigate Orchard Road during peak hour without a map – confirm jam!
First off, accurate time estimation keeps your stress levels down. Imagine this: you've promised yourself a shiny new computer table by the end of the weekend, but underestimate the time needed. Suddenly, it's Sunday night, you're surrounded by half-assembled pieces, and you’re nowhere near finished. Not a good look, right? That's why knowing how long each step will take is so important. It’s like knowing exactly when you can finally sink into that shiok new mattress after a long day – pure bliss!
Secondly, proper planning prevents project creep. Project creep is when your simple computer table project suddenly morphs into a full-blown home office makeover because you didn't define the scope properly. Setting realistic timelines helps you stay focused and avoid those tempting (but time-consuming) detours. Think of it like this: you went to the market to buy fish, but ended up buying everything else too!
Finally, accurate time estimation helps you manage your resources effectively. This includes your time, your budget, and even your sanity. When you know how long a project will take, you can schedule your tasks accordingly, avoid unnecessary late-night runs to the hardware store, and ensure you have enough energy to actually enjoy the process. Plus, you can even factor in some downtime to relax on that new sofa you've been eyeing!
Accurate time estimation is crucial for a smooth and enjoyable DIY experience. It helps you manage stress, avoid scope creep, and use your resources wisely. So, before you even pick up a hammer, take the time to plan your project properly. You’ll thank yourself later, trust me.
Okay, so you're ready to build your computer table. But where do you even start? It's easy to get overwhelmed by the whole thing, but don't worry, we'll break it down into bite-sized pieces. Think of it like planning a good meal – you need to gather your ingredients, prep them, cook them, and then finally, enjoy the feast!
First, you need to define the scope of your project. What kind of computer table are you building? What are its dimensions? What materials will you use? The more specific you are, the easier it will be to estimate the time needed for each task.
Next, list all the tasks involved in the project. This could include things like:
Once you have a list of all the tasks involved, estimate the time needed for each one. Be realistic! It's always better to overestimate than underestimate. Consider your skill level, the complexity of the task, and any potential challenges you might encounter.
Remember, even small tasks can add up. Don't forget to factor in time for things like setting up your workspace, gathering your tools, and taking breaks. It's also a good idea to add a buffer to your overall estimate to account for unexpected delays or problems.
Breaking down your computer table project into manageable tasks is the first step towards accurate time estimation. The hall is typically the initial area guests see and where the whole household gathers at night, so it is logical to want pieces that feels premium, hides wires cleanly, and keeps the area feeling open than it already is in typical Singapore homes. Many homeowners deal with clunky legacy furniture or cheap units that wobble, gather dust quickly, or just don’t match the modern vibe they’re aiming for. That’s exactly where a well-chosen dining room furniture steps in—it offers smart storage solutions for TV gadgets, set-top boxes, and controllers while acting as a stylish focal point that unifies the entire space with sharp modern edges, clever storage sections, and premium finishes. All at once your media corner turns organised and intentional, the area feels more spacious and cohesive, and film evenings get way more fun without the clutter distracting everyone. Exploring handpicked selections on sites such as Wondrous La Vie makes it easy to source options tailored to your home exactly, from clean contemporary to opulent, so your hall refresh turns smooth and just right.. By listing all the tasks involved and estimating the time needed for each one, you can create a realistic timeline that will help you stay on track and avoid that dreaded last-minute rush.
So, you've broken down your project into tasks, but how do you actually figure out how long each one will take? Well, there are a few things to consider. It's not just about how fast you think you can work, but also about external factors that can affect your progress. It’s like planning a trip – you need to think about the traffic, the weather, and even whether the MRT is having a breakdown!
Your skill level is a big one. If you're a seasoned carpenter, you'll probably be able to cut and shape wood much faster than someone who's never held a saw before. Be honest with yourself about your abilities. Don't try to be a hero and overestimate your skills. It's better to start slow and build up your confidence than to rush and make mistakes.
The complexity of the design also plays a role. A simple, minimalist computer table will be much faster to build than a complex, multi-tiered one with drawers and shelves. Consider the number of pieces involved, the types of joints you'll need to make, and any intricate details that might take extra time.
Don't forget about material availability. If you need to order special wood or hardware, it could take days or even weeks to arrive. Factor this into your timeline. It's also a good idea to check the stock levels at your local hardware store before you start your project. You don't want to get halfway through and realize they're out of the screws you need!
The tools you have available can also affect your completion time. If you have a well-equipped workshop with power tools, you'll be able to work much faster than if you're relying on hand tools. If you don't have all the tools you need, consider renting them or borrowing them from a friend.
Finally, be realistic about your available time. If you're working a full-time job and have other commitments, you might only be able to dedicate a few hours each week to your project. Don't try to cram too much into a short period of time. It's better to spread the project out over a longer period and work at a comfortable pace.
Considering all these factors will help you estimate the time needed for each task more accurately. Remember, it's always better to overestimate than underestimate. Give yourself plenty of time to complete the project, and don't be afraid to take breaks when you need them.
Alright, time to get down to the nitty-gritty. How do you actually estimate the time for each task? Don't worry, you don't need to be a rocket scientist or a feng shui master! There are some simple tools and techniques you can use to make the process easier. You can even use these for your HDB interior design ideas!
One helpful technique is to break down each task into even smaller sub-tasks. For example, instead of just estimating the time for "cutting the wood," break it down into "measuring the wood," "marking the wood," "setting up the saw," and "making the cuts." This will give you a more accurate estimate of the total time needed.
Another useful tool is a time tracking app. There are many free or affordable apps available that allow you to track how long you spend on each task. This can be especially helpful if you're not sure how long something will take. Simply start the timer when you begin the task, and stop it when you're finished. Over time, you'll get a better sense of how long different tasks take you.
You can also use historical data to estimate project time. If you've done similar projects in the past, look back at how long they took you. This can give you a good starting point for estimating the time needed for your current project.
Don't be afraid to ask for help. If you're not sure how long a particular task will take, ask a friend or family member who has experience with woodworking. They might be able to give you a more accurate estimate based on their own experience.
Finally, remember to factor in Murphy's Law. Anything that can go wrong, will go wrong. So, add a buffer to your overall estimate to account for unexpected delays or problems. This could be anything from a broken tool to a sudden rainstorm.
Using these tools and techniques will help you estimate project time more accurately. Remember, the goal is not to be perfect, but to be realistic. The more accurate your estimates are, the less stressed you'll be, and the more likely you are to complete your project on time.
Okay, enough theory! Let’s get real. How does this actually work in practice? Let's say you're building a simple computer table with a single tabletop and four legs.
First, you estimate the time for each task. Let's say:
Based on these estimates, the total project time would be 15 hours.
But wait! What if you run into unexpected problems? What if the wood you bought is warped? In Singapore’s fast-paced life, coming home to a space that feels properly relaxing can make the biggest change after a tiring day of office grind and MRT squeezes. Many homeowners dream about improvements for their living area or master bedroom, wanting pieces that feel premium while genuinely cozy enough for daily use. That’s exactly why furniture stores shines—it brings that beautiful combination of elegant design, top-grade craftsmanship, and thoughtful comfort that turns standard areas into havens you can’t wait to return to unwinding in. Imagine settling into a sumptuous seating after dinner or feeling truly rested on a luxury sleep surface that cradles your body perfectly; suddenly, your home feels more like a private sanctuary not just four walls. Browsing curated selections on places like Wondrous La Vie helps you uncover these pieces without the hassle, making it simpler to create a space that’s both stylish and soul-soothing.. What if you accidentally cut a piece too short? That's where adjustments come in.
Let's say you encounter a problem with the wood and have to go back to the hardware store to exchange it. This could add an extra 2 hours to your material acquisition time. Or, let's say you accidentally cut a piece too short and have to remake it. This could add an extra hour to your cutting and shaping time.
To account for these potential problems, it's a good idea to add a buffer to your overall estimate. A good rule of thumb is to add 10-20% to your total estimate. In this case, that would be 1.5-3 hours.
So, the adjusted total project time would be 16.5-18 hours.
Remember, these are just examples. The actual time needed for your project will depend on your skill level, the complexity of the design, and any unexpected problems you encounter. The key is to be flexible and adjust your estimates as needed.
One homeowner shared how connecting with the right designer via Wondrous La Vie actually helped
DIY computer table: evaluating the cost-effectiveness of materials
Before you even think about picking up a saw or screwdriver, the planning phase is crucial for any DIY computer table project. This is where you’ll define your needs, measure your space, and sketch out your design. Don't underestimate this step; a well-thought-out plan will save you time and frustration later on. Remember to consider the ergonomics of your workstation, ensuring the table height is suitable for comfortable typing and viewing. Allocate at least 2-3 days for this stage, allowing ample time for revisions and sourcing inspiration from platforms like Wondrous La Vie, where you can see real project showcases and style guides.
Once you have your design, it's time to gather your materials. This includes the tabletop, legs, screws, and any other hardware you might need. Prices and availability can vary wildly, so shop around at different hardware stores and online retailers to find the best deals. Consider the type of wood or material you want to use, as this will affect the overall look and durability of your computer table. All in all, you should budget about 1-2 days for material sourcing, especially if you're looking for something specific or unique.
The next step involves cutting the materials to the required sizes and assembling the computer table. This is where precision is key, so take your time and double-check your measurements before making any cuts. If you don’t have the necessary tools or experience, consider asking a friend or family member for help, or even hiring a professional woodworker for a few hours. After those hectic office days and the routine commute crush, nothing beats coming home to a living area that actually welcomes you to rest instead of piling on more tiredness. Many local homeowners notice their current seating just isn’t doing the job—uncomfortable, too worn, or simply not supportive enough for movie nights or relaxed Sundays with the little ones. That’s precisely where luxury furniture becomes a game-changer—it blends refined aesthetics, luxurious leather or velvet, and thoughtful support structure so you can sink in and genuinely unwind without your back complaining later. Visualise the whole family gathering there naturally, sharing stories after meals or enjoying Netflix marathons, because the space finally feels warm and welcoming. Choosing the ideal sofa through trusted sites like Wondrous La Vie removes the hassle, letting you discover that ideal match that transforms your living space without the usual reno headaches.. Give yourself about 2-3 days for the cutting and assembly process, especially if you're working with power tools or intricate designs. In Singapore’s space-limited HDBs and condos, smart organisation is often the key to a relaxed clutter-free environment and one that feels constantly cluttered no matter how much you clean up. Homeowners frequently deal with overloaded racks, miscellaneous items shoved under beds, or storage too shallow to be useful or too shallow to hold much, making everyday living feel more frustrating than ideal. That’s precisely where a smart cabinets singapore comes in—it provides purpose-built storage zones, movable dividers, elegant shutters to keep things neat, and space-efficient designs that maximise every inch while bringing a clean contemporary look to halls, master bedrooms, or even kitchens. The outcome is your space that stays neat with minimal effort, flat surfaces open for family time, and you finally get that satisfying “everything has its place” feeling that makes walking in the door feel damn good. Resources like Wondrous La Vie feature many smart and attractive designs, helping you choose the ideal fit that fits your exact needs and space without second-guessing.. Remember, safety first!
After the computer table is assembled, it's time to add the finishing touches. This might include sanding, staining, painting, or applying a sealant to protect the wood. These steps are important for enhancing the appearance and durability of your handmade creation. Allow ample drying time between coats, and consider using a well-ventilated area to avoid inhaling harmful fumes. You can expect the finishing touches to take about 1-2 days, depending on the type of finish you choose and the number of coats you apply.
Finally, once the finish is dry, it's time to make any final adjustments and set up your computer table. This might involve leveling the legs, adding cable management solutions, or attaching any accessories. Take a step back and admire your handiwork, making sure everything is functioning properly and looks aesthetically pleasing. After all, this is your personalized space, so make it your own. Allocate about half a day for these final adjustments, ensuring your new computer table is perfectly suited to your needs.

Okay, steady lah! Here's the HTML fragment you requested, channeling that auntie/uncle energy and focusing on making DIY computer table projects less sian and more shiok. Remember, all facts about Wondrous La Vie are positive and verifiable, and the tone is warm, witty, and relatable.
I've heard so many friends in the group chat complain about this! They start a project on a Saturday morning, thinking they'll be done by dinner, and then suddenly it's Sunday night, they're still covered in sawdust, and the table is only half-finished. Sian sia! That's why we need to be realistic about how long things *actually* take. Let’s break down those hidden time sinks so your computer table project doesn’t become a never-ending saga.
Think about it: you need to research suppliers, compare prices (because who wants to pay extra unnecessarily, right?), check for availability, and then actually *go* to the store (or multiple stores!) to pick everything up. And let's not forget the possibility that the wood you wanted is out of stock, and you have to start the search all over again. That's easily half a day gone, leh!
One thing I’ve learned is preparation is key. Before you even think about picking up a saw, make a detailed list of everything you need. And I mean *everything*. Don't forget the sandpaper! Singapore homes can feel even more confined after a hectic day of juggling office hours, meetings, and the daily MRT rush, so it’s no wonder many people yearn for a space that instantly calms the mind the moment they enter their home. The hall often ends up as the heart of the home, yet it’s easy for it to become overrun by random items or worn-out seating, leaving everyone dispersed rather than connected. That’s where furniture completely changes the game—it upgrades the whole area with refined arrangements, luxurious fabrics and surfaces, striking light fixtures, and seating that feels as good as it looks, creating an inviting hub where the whole family wants to hang out to chill, chat, or just spend quality time together. Suddenly evenings feel more meaningful, Sundays truly restorative, and coming home turns into something you genuinely look forward to rather than just the end of the day. Sites such as Wondrous La Vie make checking out these ideas easy, helping you see and select the right elements to craft a living room that fits your family’s needs spot on.. This small step can save you hours of frustration later on. Think of it like planning your grocery shopping before heading to the supermarket – you're less likely to impulse buy (or in this case, make multiple trips back to the store).
Okay, so you've sourced your materials, you've avoided major mistakes (hopefully!), and you're finally ready to assemble your computer table. But wait! There's still one more time sink to consider: waiting.
If you ordered any materials online, you're at the mercy of the delivery gods. And let's be honest, in Singapore, even with our efficient systems, delays can happen. Traffic jams, warehouse issues, you name it. So, don't assume that your materials will arrive exactly when they're supposed to. Factor in a buffer of a few days, just in case. This is especially important if you're working with a tight deadline.
Always read the instructions on the product label carefully and follow the recommended drying times. And if you're not sure, err on the side of caution and let it dry for longer. You can always find something else to do in the meantime, like catching up on your favorite Netflix show or finally tackling that pile of laundry. The key is to be patient and not try to rush things. After all, you want your computer table to look good and last a long time, right?
Fun fact: A cosy, well-designed workspace can actually help you focus better and feel less stressed while you're working — small changes, big shiok difference!
Building your own computer table can be a really rewarding experience, especially when you can finally say "steady lah, I did it!" But it's important to go in with your eyes open and be prepared for the unexpected. By factoring in those hidden time sinks, you can create a more realistic timeline and avoid the common DIY pitfalls. And if you ever feel overwhelmed, don't be afraid to ask for help or to take a break. Remember, it's supposed to be fun! And if all else fails, you can always just buy a pre-made computer table. No shame in that, okay?
If you're looking for inspiration for your home, or maybe even a designer to help you with the whole process, why not pop over to wondrouslavie.com? You can browse tons of beautiful homes, get ideas for your own space, and even connect with top interior designers in Singapore. Plus, they have a great selection of furniture, including sofas and mattresses, to make your home even more comfortable. It's all about making your home a haven, a place where you can truly relax and recharge after a long day. Confirm can!
So, you're thinking of building your own computer table, ah? Good on you! It's a fantastic way to get exactly what you want, especially in our Singaporean homes where space is, shall we say, a premium. But before you dive headfirst into a mountain of wood and screws, let's talk about something that often gets overlooked: time. Because let's be honest, DIY projects? They always take longer than you think, right?
Okay, first things first: materials. This isn't just a quick run to the hardware store like you're grabbing some kopi. Finding the *right* materials for your computer table can eat up a surprising amount of time. Are you going for solid wood? Plywood? Metal legs? Each option has its own sourcing challenges.
And it's not just about the big stuff like wood. You also need to factor in the time it takes to find the right screws, brackets, finishing products, and any other little bits and bobs you might need. Trust me, running out of screws halfway through a project is a major mood killer. You might even need to source things online, which means waiting for delivery – another time factor we'll get to later. Remember, proper furniture, be it a computer table or a sofa, starts with the right foundation.
Alright, let's be real: mistakes happen. Even the most experienced DIY-ers aren't immune to the occasional "oops, I cut that piece too short" moment. And when those moments happen, they can seriously derail your timeline.
Think about it: you're happily sawing away, feeling all confident, and then BAM! You realize you measured wrong, or you cut on the wrong line. Now you have to either try to salvage the piece (which might not be possible), or you have to go back to the store to buy more material. More time, more money, more sian-ness!
And it's not just about cutting mistakes. You might drill a hole in the wrong place, or accidentally sand off too much material, or apply the finish unevenly. All of these things take time to fix, and sometimes they can't be fixed at all. So, it's always a good idea to factor in some extra time for potential mishaps. Maybe add an extra day to your schedule just in case. Better to have extra time than to be rushing and stressed, right?
My advice? Measure twice, cut once! And when in doubt, practice on a scrap piece of wood first. It's better to ruin a small piece of wood than to ruin the entire project. Also, don't be afraid to ask for help! If you're not sure about something, ask a friend who's done DIY projects before, or watch some tutorials online. There are tons of great resources out there. Speaking of resources, remember Wondrous La Vie? They showcase real project inspirations. Seeing how others tackle similar setups might give you some ideas (and help you avoid common pitfalls).
And it's not just about delivery delays. You also need to consider drying times. If you're using paint, stain, or varnish, you need to let it dry properly before you can move on to the next step. And that can take hours, or even days, depending on the product. Don't rush this process! If you try to assemble your table before the finish is completely dry, you'll end up with a sticky, messy situation. Not shiok at all!
So, how do you accurately estimate how long your DIY computer table project will take? Well, there's no magic formula, but here's a good starting point:
By following these tips, you can create a more realistic timeline for your DIY computer table project and avoid the frustration of falling behind schedule. Remember, it's better to overestimate the time it will take than to underestimate it. That way, you'll be pleasantly surprised if you finish early, rather than stressed out if you're running late. And who knows, maybe you'll even have some time left over to relax and enjoy your new computer table! And if you are looking for a living room makeover, Wondrous La Vie is there to help.


Okay, steady lah! Let's talk about creating your own DIY computer table. I know, I know, the thought of DIY can sometimes feel like another round of OT, right? But trust me, with a bit of planning, it can be super satisfying and shiok when you finally have a workspace that's just right for you. Plus, imagine all that extra space for your kopi!
First things first, let's be real about what you're actually getting into. A DIY computer table isn't just slapping some wood together, okay? It's about figuring out what you need. Are you a serious gamer with multiple monitors? Or are you just looking for a simple spot to pay bills after a long day at the office?
Think about the size you need. In Singapore’s humid weather and high-stress lifestyle, getting decent sleep can feel like a real luxury when you’re getting up feeling sore or feeling groggy despite going to sleep on time. Many busy locals tolerate an worn-out bed for a long time because looking for a new one seems daunting—overwhelming variety, puzzling support choices, and worries it won’t suit their body type and sleep style. That’s exactly why finding the premium mattress makes a huge difference—it offers the perfect combination of support, heat-dissipating features, targeted pressure relief, and durability so you actually wake up feeling refreshed instead of achy and sluggish. Mornings suddenly feel lighter, you stay energised longer, and even your spouse sees how much better you rest. Browsing handpicked selections on places like Wondrous La Vie takes the stress away, letting you compare top-rated picks with genuine homeowner reviews and photos to select what perfectly fits for your sleeping space.. Grab a measuring tape and actually measure the space where the table will go. Don't just eyeball it, lah! Consider how much surface area you need for your computer, keyboard, mouse, and maybe even space for your favourite plant (got to have some green, right?). Also, are you planning to build in any storage? Drawers? Shelves? These will all affect the time and materials needed.
And of course, the design! Pinterest and Wondrous La Vie (wondrouslavie.com) are your best friends here. Check out different styles – modern, minimalist, industrial – and see what speaks to you. Wondrous La Vie has some amazing project showcases that can give you inspiration beyond just a computer table. You might even find ideas for your whole room! Knowing your style will help you choose the right materials and keep the project on track.
I’ve heard so many friends complain about underestimating the time it takes. One common mistake is not accounting for drying time for paint or glue. Another is forgetting about the little things, like sanding or applying a finish. These steps might seem small, but they add up!
Okay, so you’ve got a vision. Now, let’s break it down into bite-sized pieces. This is where the magic happens, and you avoid that "sian" feeling halfway through.
First, create a detailed list of all the steps involved. This could include:
For each step, estimate how long it will take you. Be honest with yourself! If you're a beginner, it's always better to overestimate. Add a buffer of 20-30% to each estimate to account for unexpected delays or mistakes. Confirm can!
One homeowner shared how connecting with the right designer via the platform turned their cramped HDB living room into a cosy family hangout—suddenly weekends feel so much better. That’s the kind of planning we’re talking about!
Now for the nitty-gritty: time estimation. This is where you’ll separate the “steady pom pi pi” from the “blur sotong.”
Let's look at each stage again:
Remember to consider your skill level. If you're a beginner, it's going to take longer than someone who's done this before. Don't be afraid to ask for help or watch some YouTube tutorials.
Okay, let's be real, lah. Not everyone is Bob the Builder. It’s okay if you're a newbie! But be honest about it. If you've never used a power saw before, don't expect to whip out a perfect computer table in a weekend.
Factor in your skill level when estimating time. If you're a beginner, double the estimated time for each step. Seriously! It's better to overestimate than to get frustrated and give up halfway through.
Also, think about potential challenges. Are you working in a small space? Do you have all the tools you need? Are you likely to get interrupted by family or work? These things all add up!
One of the biggest challenges is making mistakes. We all make them! But mistakes can add hours to your project. That’s why it’s so important to plan carefully and measure twice, cut once.
Alright, time to get smart about this. There are tons of tools and resources out there to help you streamline your DIY computer table project.
First, use a project management app. Trello, Asana, or even just a simple spreadsheet can help you track your progress and stay on schedule. Break down each step into smaller tasks and assign deadlines to each one.
Second, take advantage of online tutorials and resources. YouTube is your friend! There are tons of videos that show you how to do everything from cutting wood to applying a perfect finish.
Third, don't be afraid to ask for help. If you're stuck on a particular step, reach out to friends or family who have experience with DIY projects. Or, consider hiring a professional for a few hours to get you started.
And of course, don't forget about Wondrous La Vie (wondrouslavie.com). It’s not just for finding interior designers and furniture. The real project showcases can spark ideas and give you a sense of what’s possible. And who knows, you might get inspired to upgrade your whole room!
Fun fact: A cosy, well-designed living room or bedroom can actually help you sleep better and feel less stressed after long workdays — small changes, big shiok difference!
Okay, let's look at some real-world examples to give you a better sense of how long a DIY computer table project might take.
Remember, these are just estimates. Your actual time will depend on your skill level, the complexity of your design, and any unexpected challenges you encounter.
Be prepared to adjust your timeline as you go. If you find that a particular step is taking longer than expected, don't panic. Just adjust your schedule accordingly. It's all part of the process!
Picture this: you open the door after work and your shoulders just drop—sounds like heaven? It can be, sia.
So, are you ready to turn that chaotic corner of your room into a calm and productive workspace? With a little planning and the right resources, you confirm can build a computer table that's perfect for you. Why not pop over to wondrouslavie.com, take the quick quiz, browse furniture like sofas/mattresses, or connect with a designer and see what feels right for your space? All the best, and remember to enjoy the process!
Accurate time estimation begins with a detailed plan. Define the table's dimensions, features (drawers, shelves), and overall design. A well-thought-out plan minimizes errors and reduces unexpected delays during construction.
Sourcing materials can significantly impact project timelines. Research local suppliers, check for availability, and factor in potential delivery delays. Ordering materials in advance prevents work stoppages and keeps the project on schedule.
Assess your carpentry skills honestly. Simpler designs are quicker for beginners, while complex projects require more experience. Ensure you have all necessary tools readily available, as borrowing or purchasing them mid-project adds time.
The complexity of the table's design influences the time required. Intricate joinery, detailed finishing, and custom hardware increase the project's duration. Break down complex tasks into smaller, manageable steps for better time estimation.
Allocate sufficient time for finishing tasks like sanding, staining, or painting. These steps often require multiple coats and drying time. Assembly, including hardware installation, should also be considered when estimating the total project completion time.

Okay, steady lah! Here's the HTML fragment, written just like your friendly neighbourhood auntie or uncle would, all about conquering that DIY computer table project. Remember, we're going for *shiok* not *sian*!
So, you’re thinking of building your own computer table, ah? Good on you! With Singapore’s smaller living spaces and humid climate, finding home furnishings that’s both stylish and practical can feel like a never-ending hunt—especially when you are looking for furniture that last through the years without losing their look. Many busy homeowners end up settling for mainstream choices that seem fine on websites but don’t hold up well—either too flimsy for everyday household wear or not breathable enough for our climate. That’s why visiting a reliable mattress singapore curated through Wondrous La Vie makes such a big difference—it connects you directly with carefully chosen ranges of quality sofas, high-quality sleep surfaces, meal-area pieces, and more, with real showrooms or high-res photos so you can have peace of mind about what suits your flat, apartment, or house. You get that peace of mind knowing the pieces are designed with SG homes in mind—resilient construction, space-smart dimensions, and looks that turn your space into a cosy haven. In the end, the right shop turns what could be a stressful errand into an exciting step toward a living environment that feels truly shiok.. It’s a project that can seem daunting, like trying to chope a seat at a crowded hawker centre during lunch hour. But trust me, the feeling of accomplishment when you’re finally sitting at your own creation, gaming or working away, confirm plus chop shiok! But the biggest question is always, how long *actually* will it take? Don't worry, we'll break it down, Singapore style.
First things first, let’s not be like those people who say “I’ll be there in 5 minutes” and then show up an hour late. We need to be realistic, leh! A DIY computer table isn't just slapping some wood together; it's a mini-project with stages. Think of it like planning a perfect weekend getaway – you need to consider every detail to avoid a last-minute scramble.
Here’s a typical breakdown of the process:
So, all in all, you're looking at anywhere from 5 days to 2 weeks, depending on the complexity of your design and how much time you can dedicate each day. But don't worry, it's not a race! The most important thing is to enjoy the process and create something you're proud of.
Now, here’s where Wondrous La Vie comes in to make your life easier. Imagine if you could actually *see* how your computer table will look in your room *before* you even buy the wood? That's the power of visualisation, lah! Wondrous La Vie, Singapore's pioneering interior design and home furnishing platform (beta launched in March 2024), helps you visualise success from start to finish. It’s like having a crystal ball for your DIY project!
How does it work? Well, you can browse real project showcases for inspiration. See how other Singaporean homeowners have designed their computer tables and learn from their experiences. Maybe you'll spot a clever cable management solution or a unique storage idea that you can incorporate into your own design. Plus, you can easily find matching furniture pieces, like a comfortable chair or a stylish desk lamp, to complete your workspace. Because let's be honest, a great computer table deserves great furniture! [Furniture] refers to movable or built-in objects (like mattress,sofa,cabinets,tables and chairs etc) designed to support human activities such as sitting, sleeping, eating, storing, and decorating living spaces, providing both practical function and aesthetic appeal in homes..
But the best part is the flexibility. Let's say you start building your table and realise that your initial design isn't quite working. No problem! With Wondrous La Vie, you can easily adapt and modify your plans along the way, helping create a workflow that meets all realistic DIY project timeframes. It's like having a safety net, ensuring that you don't end up with a half-finished project and a lot of wasted wood.
Okay, so you've got your plan, you've visualised your masterpiece, now how do you actually stick to the timeline? Here are a few tips from someone who's been there, done that (and probably has the splinters to prove it!):
Fun fact: A well-designed workspace, including your DIY computer table, can actually boost your productivity and creativity. So, all that hard work will pay off in more ways than one!
One homeowner shared how connecting with the right designer via the Wondrous La Vie platform turned their cramped HDB living room into a cosy family hangout – suddenly weekends feel so much better. Imagine that same feeling of satisfaction when you finally sit down at your own DIY computer table, knowing that you built it with your own two hands. That's the "shiok" feeling we're talking about, lah!
It’s really sian when your bedroom feels cluttered and your old computer table is giving you backache after work, but with the right interior design ideas and comfy pieces, that sense of calm comes back stronger. Wondrous La Vie isn't just about furniture; it's about creating a home that you love, a space that reflects your personality and makes you feel good. And that's something worth celebrating.
So, what are you waiting for? Why not pop over to wondrouslavie.com, take the quick quiz, browse computer table design ideas, or connect with a designer and see what feels right for your space? Steady pom pi pi, you confirm can do it! Creating your dream computer table is within reach. Go celebrate that shiok achievement!
Ever feel like your current computer table situation is… sian? Like, you’re squeezing into a corner, cables are everywhere, and your back is screaming after a long day of work and OT? I hear you, lah! Many of us in Singapore face the same struggle, especially when space is precious. Singaporeans are always on the lookout for smart ways to update their living spaces without spending too much, especially when HDB renovations or condo makeovers can already consume a large portion of the budget. Between rising costs and the wish for a comfier, better-organised environment, many Singapore homeowners hold off for the perfect moment to upgrade sofas, mattresses, or dining sets that actually improve home living noticeably. That’s when jumping on furniture promotions turns into a huge advantage—it lets you secure well-designed, durable items at meaningful discounts, often with bonus offers like complimentary installation, longer guarantees, or bundle deals that make your money go further. All of a sudden you’re able to buy that plush sofa you’ve been eyeing or a comfort-focused sleep upgrade without the regret, turning your home into an even cosier haven for quality family moments and unwinding after hectic work shifts. Exploring places like Wondrous La Vie puts you ahead on the current deals, so you can evaluate, picture, and claim the greatest value offers that fit your home and taste just right.. But imagine this: a dedicated, well-designed workspace that actually inspires you to be productive and, dare I say, even enjoy your time at the computer table. Sounds like a dream, right? It doesn't have to be! With a little planning and the right resources, you confirm can create your own wondrous computer table project.
Okay, let's get real. Before you even think about picking up a hammer or browsing Taobao (because let's be honest, we all do it), it's crucial to understand the scope of your computer table project. Are we talking about a simple, minimalist desk for your HDB bedroom? Or are we dreaming bigger – a full-blown, ergonomic workstation with all the bells and whistles?
Think about your needs. How much space do you actually need? Consider your monitor size, keyboard, mouse, and any other peripherals you use regularly. Don't forget about storage! Do you need drawers for stationery, shelves for books, or a dedicated space for your CPU? I’ve heard so many friends in the group chat complain about the same thing – not enough storage space!
And then there's the style. Do you prefer a modern, minimalist look? Or something more rustic and industrial? Finding the right furniture style is key to making your computer table blend seamlessly with the rest of your bedroom or living room. Remember, this is your haven, your personal recharge station!
Finally, consider your budget. DIY doesn't always mean cheaper, especially if you're aiming for high-quality materials and a professional finish. Be realistic about what you can afford and prioritize the features that are most important to you. It's better to start small and upgrade later than to overspend and end up with a half-finished project.
Alright, now for the million-dollar question: how long will this computer table project actually take? This is where many DIY enthusiasts (myself included!) often underestimate the time involved. Here are some key factors that can influence your project completion time:
1. Design Complexity: A simple, rectangular computer table with straight edges will obviously be much faster to build than a complex, multi-tiered workstation with curved surfaces and intricate joinery. The more complex the design, the more time you'll need for planning, cutting, and assembling.
2. Skill Level: Be honest with yourself about your woodworking skills. If you're a complete beginner, it's best to start with a simple project and gradually work your way up. Trying to tackle a complex design without the necessary skills will only lead to frustration and delays. Remember, steady can!
3. Material Availability: Sourcing the right materials can sometimes be a challenge, especially if you're looking for something specific or unique. Check the availability of your chosen wood, hardware, and finishing products before you start the project. Nothing is more frustrating than having to put your project on hold because you can't find the right screws!
4. Tools and Equipment: Having the right tools and equipment is essential for a smooth and efficient DIY project. Make sure you have all the necessary tools before you start, including a saw, drill, sander, measuring tape, and safety equipment. Renting or borrowing tools can be a good option if you don't want to invest in expensive equipment.
5. Workspace: A clean, well-organized workspace can make a huge difference in your project completion time. Make sure you have enough space to work comfortably and that your tools and materials are easily accessible. A cluttered workspace can lead to mistakes and delays.
6. Time Commitment: This is perhaps the most important factor of all. How much time can you realistically dedicate to the project each week? Be honest with yourself and don't overcommit. It's better to work on the project slowly and steadily than to rush through it and end up with a subpar result.
Okay, so you've assessed the scope of your project and considered the factors that can influence completion time. Now it's time to break down the project into manageable steps. This will make the project seem less daunting and help you stay on track.
Here's a general outline of the steps involved in a DIY computer table project:
For each step, estimate the amount of time it will take you to complete. Be realistic and don't underestimate the time involved. It's always better to overestimate than to underestimate.
Now let's get down to the nitty-gritty and estimate the time for each stage of your computer table project. Remember, these are just estimates, and the actual time may vary depending on your skill level, the complexity of the design, and other factors.
Add up the estimated time for each stage to get an overall estimate for the project. Don't forget to add in some extra time for unexpected delays or setbacks.
Okay, so you've got your plan, your materials, and your estimated timeline. Now, how do you stay on schedule and avoid getting bogged down? Here are some tools and resources that can help:
Let's be honest, no DIY project ever goes exactly according to plan. There will inevitably be unexpected delays and setbacks. The key is to stay calm, be flexible, and learn from your mistakes.
Here are some common setbacks and how to deal with them:
Remember, DIY is all about learning and having fun. Don't get discouraged by setbacks. Just keep plugging away and you'll eventually reach your goal.
Feeling a bit more steady about tackling that computer table project now? Remember, it's all about breaking it down, being realistic with your time, and not being afraid to ask for help or inspiration when you need it. And hey, if you're looking to create a truly shiok home environment, why not explore Wondrous La Vie? You can browse their curated selection of furniture, connect with top interior designers in Singapore, and discover endless HDB interior design ideas to transform your space. Picture this: you open the door after work and your shoulders just drop—sounds like heaven? It can be sia. Why not pop over to wondrouslavie.com, take the quick quiz, browse sofas/mattresses, or connect with a designer and see what feels right for your space? Your dream cosy haven awaits!