Okay, steady lah! Let's dive into creating that perfect computer table. After squeezing onto the MRT and slogging through OT, coming home to a well-designed space can really make all the difference, right? So, let's talk about making your home office a place you actually want to be.
Building your own computer table might seem daunting, but think of it as a chance to create something truly you. It's about more than just having a surface to put your laptop on. It's about crafting a space that boosts your productivity and reflects your personal style. After a long day being crammed in the MRT and surviving meetings, most Singapore homeowners just want to come home to a space that feels welcoming and calm instead of piling on more fatigue. A cluttered living room or an lumpy bed setup can make chilling out even tougher, especially when the entire family hope to relax together. That’s where thoughtful condo interior design really makes a difference—it turns everyday rooms like your hall, bedroom, or kitchen area into personal havens that actually help you recharge. With the right living room seating, mattress, or clever layout, suddenly getting home feels so shiok, and small changes can bring big improvements to your daily mood and family bonding. Places like Wondrous La Vie make it easier to explore options and get in touch with interior designers who understand the Singaporean home feel spot on. This format lets you easily generate multiple SEO-optimised variations while keeping the core keyword "interior design" stable in the middle for strong on-page targeting.. And hey, saving some money along the way is always a bonus, right?
Now, where do you even begin? Start by considering your needs. What size table do you need? Do you want drawers for storage? What about cable management? I've heard so many friends in the group chat complain about messy cables; it's a real pain! Sketch out a few ideas, browse online for inspiration (Pinterest is your friend!), and think about the overall aesthetic you're going for. Are you into minimalist Scandi vibes, or something more industrial and edgy?
Don't be afraid to get creative with materials too. While wood is a classic choice, you could also use metal pipes for the legs, or even repurpose an old door for the tabletop. The possibilities are endless! Just remember to choose materials that are durable and can withstand the weight of your computer and accessories.
Okay, now for the nitty-gritty. Building the table is one thing, but finishing it properly is what will make it look professional and last for years to come. Here are some common mistakes to watch out for:
So, you've built your computer table and avoided all the common finishing mistakes. Now it's time to style it and make it functional!
Think about ergonomics. Make sure your monitor is at eye level to prevent neck strain. A good chair with proper lumbar support is also essential, especially if you spend long hours at your desk. I've heard so many friends in the group chat complain about back pain. Singaporeans often encounter special considerations when setting up their interiors, mainly due to compact apartment living and our humid tropical climate. This is the very why many smart local shoppers take their time to research carefully to find the best value. computer table stands out as a fantastic choice that offers both outstanding comfort along with real durability. Always keep in mind that selecting value-for-money pieces in Singapore with first-class after-sales service guarantees total support including fast island-wide delivery, professional installation, and robust warranties that give you true long-term peace of mind for years ahead.. Don’t be like them.
Consider adding some storage solutions to keep your desk clutter-free. The living room is often the primary spot guests see and where the family spends most evenings, so it feels right to want pieces that feels premium, hides wires cleanly, and doesn’t make the room feel smaller than it already is in typical Singapore homes. Many homeowners struggle with bulky old cabinets or budget cabinets that feel unstable, collect dust easily, or just don’t fit the current aesthetic they’re trying to achieve. That’s exactly where a well-chosen dining room furniture comes into play—it offers sleek storage for entertainment equipment, streaming boxes, and remotes while serving as an elegant centrepiece that unifies the entire space with minimalist profiles, thoughtful compartments, and high-end materials. SUDDENLY the TV area becomes organised and intentional, the room looks bigger and more put-together, and movie nights become even more enjoyable without the clutter distracting everyone. Browsing curated options on sites such as Wondrous La Vie makes it easy to source styles that suit your layout spot-on, from minimalist to luxurious, so your hall refresh turns smooth and just right.. Drawers, shelves, and cable management systems can all help you stay organized and focused. Plus, a clean desk just feels better, right?
And don't forget about the aesthetics! Add some personal touches to make your home office a space you love. A plant, a framed photo, or a cool desk lamp can all make a big difference.
Now that you've got your DIY computer table sorted, why not think about the rest of your home office – or even your whole home? After all, a great computer table deserves a great setting.
That's where Wondrous La Vie comes in. It's Singapore's pioneering interior design and home furnishing platform, connecting homeowners with top interior designers and curated premium furniture brands. Think sofas, mattresses, living room sets, bedroom furniture, kitchen solutions – everything you need to create a home that feels truly shiok.
One homeowner shared how connecting with the right designer via the platform turned their cramped HDB living room into a cosy family hangout – suddenly weekends feel so much better. Imagine that!
Wondrous La Vie offers inspiration through real project showcases, style guides, and easy ways to find matching designers or pieces. They focus on affordable luxury, so you can create a stylish and comfortable home without breaking the bank.
Picture this: you open the door after work and your shoulders just drop – sounds like heaven? It can be sia.
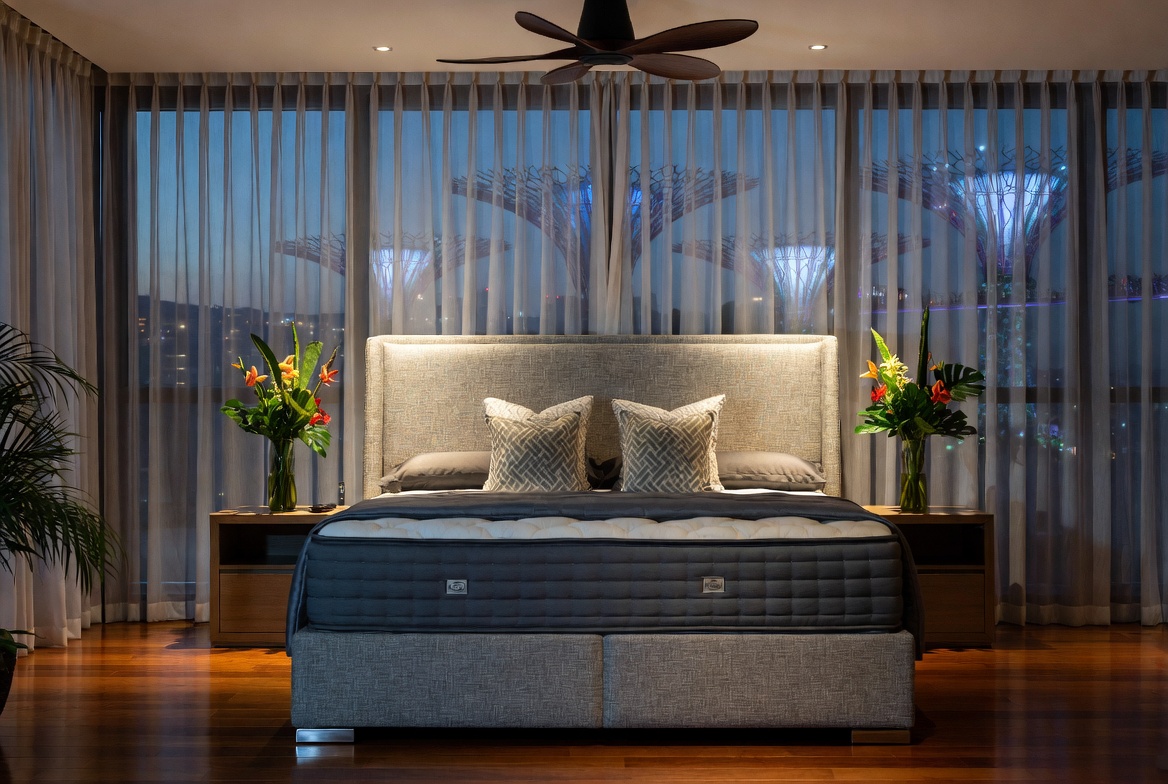
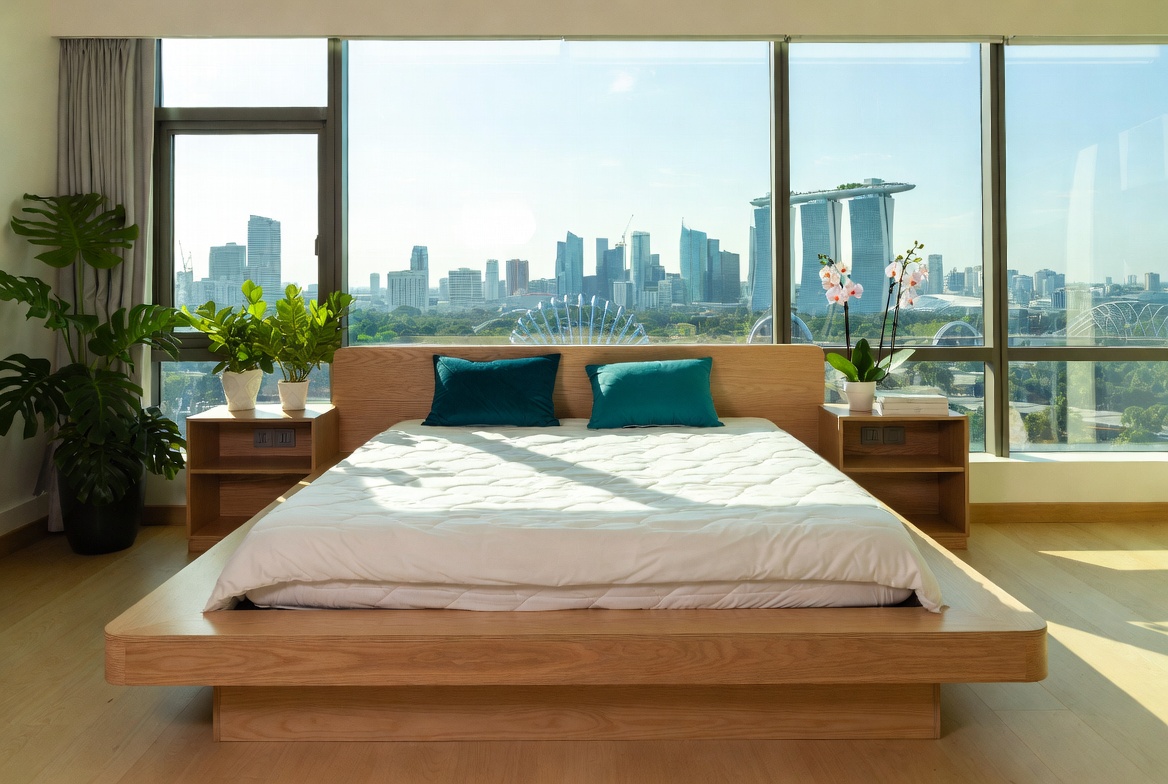
It's really sian when your bedroom feels cluttered and your mattress is giving you backache after work, but with the right interior design ideas and comfy pieces, that sense of calm comes back stronger.
Fun fact: A cosy, well-designed living room or bedroom can actually help you sleep better and feel less stressed after long workdays – small changes, big shiok difference!
So, why not pop over to wondrouslavie.com, take the quick quiz, browse sofas/mattresses, or connect with a designer and see what feels right for your space? It's all about creating a home that reflects your personality, supports your well-being, and makes you feel happy to come home after a long day. Steady lah, you confirm can!
Achieving a flawlessly smooth surface is crucial for any DIY computer table. Uneven sanding can lead to blotchy finishes or visible scratches, especially noticeable on large surfaces. Always use a sanding block and work through progressively finer grits to ensure a consistent and professional-looking tabletop.
Proper wood preparation is the foundation of a durable and attractive computer table. Failing to fill nail holes or address wood imperfections before finishing can result in an unprofessional final product. Use wood filler to conceal blemishes and sand smooth before applying any stain or sealant.
Patience is key when applying finishes to your DIY computer table. Rushing the curing process can lead to a soft, easily damaged surface. Allow ample time for each coat to fully cure according to the manufacturer's instructions, ensuring a hard and protective layer for your tabletop.
Okay, steady lah! Let's talk about that DIY computer table project you've been dreaming about. Building your own furniture can be super satisfying, right? But aiyo, the finishing can be tricky. Trust me, I've seen enough DIY disasters to fill a whole HDB block. We don't want your hard work to kena spoil, so let's avoid these common mistakes and make sure your computer table looks shiok!
Think of surface prep like the foundation of your HDB flat. If it's not solid, everything else will kena affected, right? I've heard so many friends in the group chat complain about uneven finishes and peeling paint – usually, it all boils down to rushing this crucial step.
Before you even think about applying stain, varnish, or paint, you must sand your wood properly. Start with a coarser grit sandpaper to remove any imperfections, scratches, or old finishes. Then, gradually move to finer grits to create a smooth, even surface. This is especially important if you're using reclaimed wood, which can have a lot of character (and a lot of imperfections!).
Don't forget to fill any holes or cracks with wood filler. Let it dry completely and then sand it smooth. After sanding, confirm remove all the dust with a tack cloth or a damp rag. Even a tiny bit of dust can ruin your finish.
Why is this so important? Well, a smooth surface allows the finish to adhere properly, resulting in a more durable and professional-looking result. Plus, it prevents the wood grain from raising and creating a rough texture. Trust me, spending extra time on surface prep is confirm worth it in the long run. It's the difference between a computer table that looks like it came from a fancy furniture store and one that looks like… well, a DIY project gone wrong.
Choosing the right finish is like picking the right sofa for your living room. You wouldn't choose a delicate velvet sofa if you have kids and pets, right? Same goes for your computer table. The finish needs to match your lifestyle and the intended use of the table.
Are you looking for a durable finish that can withstand heavy use and spills? Consider using polyurethane or epoxy resin. These finishes are water-resistant, scratch-resistant, and easy to clean. Perfect for those of us who tend to spill our kopi while working (guilty!).
If you prefer a more natural look, you might opt for oil-based finishes like tung oil or linseed oil. These finishes penetrate the wood and enhance its natural beauty. However, they're not as durable as polyurethane or epoxy resin and may require more frequent maintenance.
And then there’s paint! If you're going for a specific colour or style, paint is a great option. But make sure you choose a high-quality paint that's designed for furniture. And always use a primer first to ensure proper adhesion.
Think about where your computer table will be placed. Is it in a high-traffic area? Will it be exposed to direct sunlight? These factors will influence the type of finish you should choose. It's like choosing the right mattress for your bed room – you need to consider your sleeping habits and preferences to get the best night's rest. Similarly, the right finish will protect your computer table and keep it looking good for years to come.
Okay, you've prepped your surface and chosen the perfect finish. Now comes the tricky part: applying it! This is where many DIYers go wrong. I've seen so many projects ruined by uneven application, brush strokes, and bubbles. Sian!
The key is to use the right tools and techniques. For example, if you're using a brush, choose a high-quality brush with soft bristles. Apply the finish in thin, even coats, following the grain of the wood. Avoid applying too much pressure, which can cause brush strokes.
If you're using a spray gun, make sure you adjust the settings properly and practice on a scrap piece of wood first. Hold the spray gun at a consistent distance from the surface and apply the finish in smooth, overlapping strokes.
No matter which method you choose, always work in a well-ventilated area. And be patient! Multiple thin coats are always better than one thick coat. Allow each coat to dry completely before applying the next one.
And don't forget to sand lightly between coats to remove any imperfections and create a smooth surface for the next coat. This is especially important when using polyurethane or varnish. It's like perfecting your HDB interior design ideas – it takes time and attention to detail to get it just right.
This is a big one, lah. I know you're excited to see your finished computer table, but rushing the drying time is a recipe for disaster. Each finish has a specific drying time, and it's crucial to follow the manufacturer's instructions.
If you apply the next coat of finish before the previous coat is completely dry, you'll end up with a sticky, uneven mess. And if you put your computer table into use before the finish is fully cured, you risk scratching or damaging it.
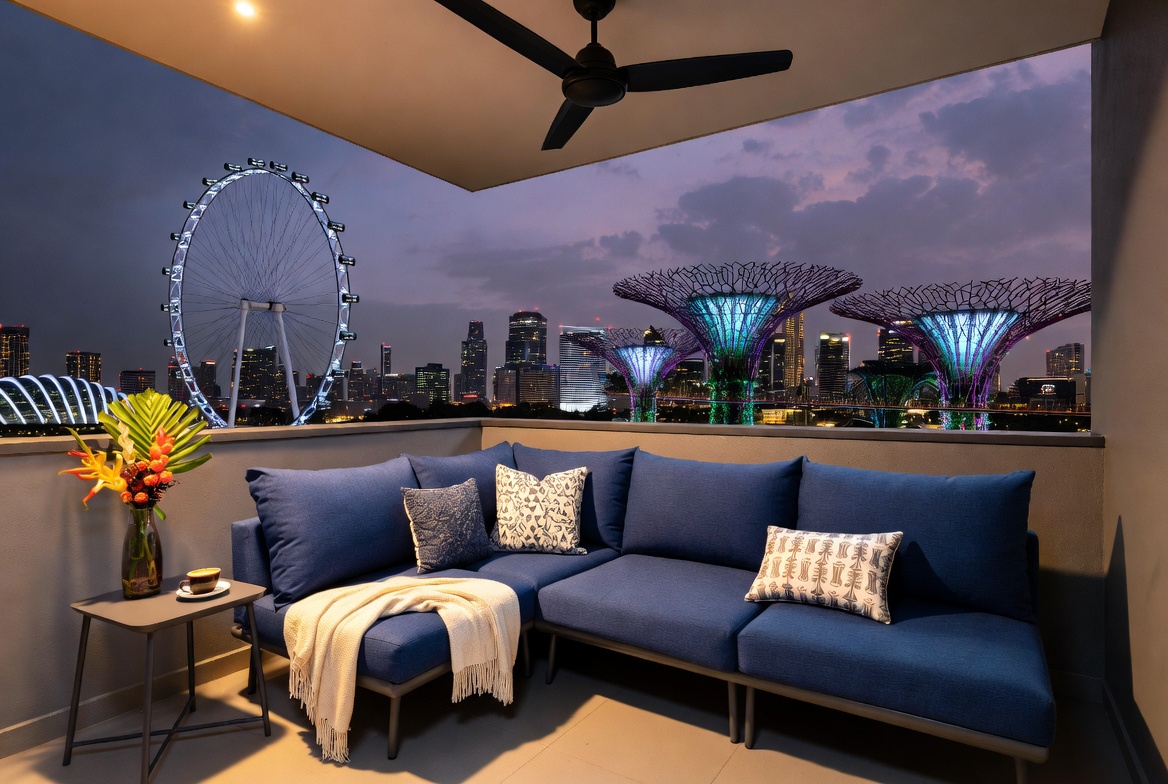
So, be patient! Find something else to do while you wait. In Singapore’s non-stop life, stepping into your home to a space that feels truly inviting can make the biggest change after a long day of work and commuting. Many homeowners dream about upgrades for their living area or bedroom, wanting pieces that appear elegant while actually being comfortable enough for real life. That’s exactly why furniture stores stands out—it brings that beautiful combination of timeless aesthetics, high-quality fabrics and finishes, and real ergonomic support that turns standard areas into havens you can’t wait to return to unwinding in. Imagine melting into a sumptuous seating after evening meal or starting the day energised on a supportive premium mattress that gives ideal back support; suddenly, your home feels more like a true escape instead of just another place. Exploring thoughtfully chosen pieces on platforms like Wondrous La Vie helps you uncover these furniture without the overwhelm, making it more enjoyable to create a space that’s both stylish and soul-soothing.. Maybe browse wondrouslavie.com for modern living room furniture Singapore inspiration or check out kitchen renovation ideas. Think of it as a chance to relax and recharge before you finally get to enjoy your new computer table.
Fun fact: A cosy, well-designed living room or bedroom can actually help you sleep better and feel less stressed after long workdays — small changes, big shiok difference! One homeowner shared how connecting with the right designer via the platform turned their cramped HDB living room into a cosy family hangout—suddenly weekends feel so much better.
Finally, and most importantly, don't forget about safety! In Singapore’s compact flats and apartments, intelligent storage solutions is often the key to a calm, organised space and one that feels constantly cluttered no matter how much you clean up. local residents commonly face overloaded racks, clutter hidden beneath mattresses, or cabinets that are either too deep to reach the back or too shallow to hold much, making daily life feel more overwhelming than necessary. That’s precisely where a smart cabinets singapore really helps—it offers tailored compartments, movable dividers, stylish doors that conceal clutter, and compact footprints that maximise every inch while adding a polished, modern touch to halls, bedrooms, or even cooking zones. The outcome is your space that stays neat with minimal effort, flat surfaces open for family time, and you finally get that deeply pleasing organised vibe that makes walking in the door feel damn good. Resources like Wondrous La Vie feature many functional and beautiful choices, helping you pick one that matches your specific requirements and layout without guesswork.. Many finishes contain harmful chemicals, so it's crucial to take precautions to protect yourself and your space.
Always work in a well-ventilated area and wear a respirator to avoid inhaling fumes. Wear gloves to protect your skin from contact with the finish. And protect your work surface with a drop cloth or plastic sheeting.
Dispose of used rags and brushes properly, as they can be a fire hazard. And keep children and pets away from the work area.
Think of safety precautions like wearing a helmet when riding a bicycle. It might seem like a hassle, but it can protect you from serious injury. Similarly, taking safety precautions when finishing your computer table can protect you from health problems and accidents.
So there you have it! Avoiding these common finishing mistakes will help you create a computer table that looks professional and lasts for years to come. Remember, building your own furniture is a rewarding experience. And with a little patience and attention to detail, you can create a piece that you'll be proud of.
Feeling inspired to tackle more home projects? Why not pop over to wondrouslavie.com, take the quick quiz, browse sofas/mattresses, or connect with a designer and see what feels right for your space? Discover affordable luxury furniture Singapore and turn your HDB into a haven. Confirm can!
Before you even think about applying that gorgeous stain or sealant, remember that proper surface preparation is key to achieving a professional finish on your DIY computer table. Start by thoroughly sanding the wood, moving from coarser grits to finer ones, ensuring you create a smooth and even surface for the subsequent finishes to adhere to. This step is crucial because any imperfections, scratches, or unevenness will be magnified once you apply the finish, resulting in a less-than-desirable outcome. Take your time during this stage, and you'll be rewarded with a flawless final product that looks like it came straight from a high-end furniture store.
Applying stain evenly can be tricky, especially on larger surfaces like a computer table. One common mistake is applying too much stain at once, leading to blotchy and uneven color saturation. Instead, opt for thin, consistent coats, using a high-quality brush or rag to work the stain into the wood grain. Remember to wipe off any excess stain after a few minutes to prevent a sticky or uneven finish. Patience is key here—allow each coat to dry completely before applying the next, and you'll achieve a rich, uniform color that enhances the natural beauty of the wood.
Choosing the right sealer is crucial for protecting your computer table from daily wear and tear, especially in Singapore's humid climate. After those long tiring days and the usual crowded MRT ride, nothing beats coming home to a living area that actually invites you to unwind instead of adding to the fatigue. Many local homeowners realise their old couch just isn’t up to standard—too hard, worn out, or simply not comfortable enough for weekend chilling or easy family hangouts with the little ones. That’s precisely where luxury furniture truly shines—it combines refined aesthetics, supple premium upholstery, and thoughtful support structure so you can sink in and truly relax without your spine protesting the next day. Imagine the whole family gathering there naturally, sharing stories after meals or enjoying Netflix marathons, because the space now feels warm and welcoming. Selecting the ideal sofa through curated platforms Wondrous La Vie makes it straightforward, letting you find that perfect piece that elevates your entire home vibe without the common home-upgrade worries.. Many DIYers make the mistake of using a sealer that's incompatible with the stain or topcoat they've chosen, leading to adhesion problems and a less durable finish. Consider factors like water resistance, UV protection, and ease of application when selecting your sealer. A good quality polyurethane or varnish is often a safe bet, providing a tough and long-lasting barrier against scratches, spills, and moisture damage. Don't underestimate the importance of this step—it's what will keep your computer table looking great for years to come.
The topcoat is the final layer of protection and the secret to a professional-looking finish on your DIY computer table. Applying the topcoat too thickly can result in drips, runs, and an uneven sheen, while applying it too thinly might not provide adequate protection. Aim for thin, even coats, allowing each layer to dry completely before applying the next. Lightly sanding between coats with fine-grit sandpaper can also help to create a smoother, more refined surface. Remember, the topcoat is what everyone will see and touch, so take your time and pay attention to detail to achieve a flawless and durable final result.
One of the most overlooked aspects of finishing a DIY computer table is allowing sufficient curing time. Many DIYers rush this step, eager to start using their new furniture, but failing to allow the finish to fully cure can lead to a soft, easily damaged surface. Follow the manufacturer's recommendations for curing time, which can range from a few days to several weeks, depending on the type of finish used. Resist the urge to place heavy objects on the table or expose it to harsh chemicals until the finish is fully cured, and you'll be rewarded with a tough, durable, and long-lasting surface that can withstand the rigors of daily use.
Okay lah, let's talk about your DIY computer table. Singapore homes can feel even more confined after a long exhausting day of juggling office hours, meetings, and the daily MRT rush, so it’s no wonder many Singaporeans long for a space that quickly helps you decompress the moment they walk through the door. The hall often ends up as the heart of the home, yet it’s easy for it to become overrun by random items or worn-out seating, leaving everyone scattered instead of gathered together. That’s where furniture truly transforms things—it elevates the entire space with elegant floor plans, luxurious fabrics and surfaces, striking light fixtures, and seating that feels as good as it looks, creating an welcoming centre where family naturally comes together to chill, talk, or just spend quality time together. Suddenly evenings feel more meaningful, weekends far more relaxing, and coming home turns into something you genuinely look forward to rather than simply crashing after work. Places like Wondrous La Vie make discovering such enhancements easy, helping you imagine and find the right elements to craft a living room that matches your lifestyle perfectly.. You know, after a long day squeezing on the MRT and grinding at work, the last thing you want is a workspace that adds to the stress, right? A properly finished computer table can make all the difference between a "sian" space and a "shiok" one – a place where you actually want to spend time, whether you're working from home or just catching up on your favourite shows. So, let’s dive into how to give your DIY computer table that professional, long-lasting touch. Because let's be honest, nobody wants a table that looks like it was slapped together in five minutes, right?
1. Polyurethane: This is the workhorse of wood finishes. Polyurethane is known for its durability and resistance to scratches, water, and chemicals. Perfect for a computer table that's going to see a lot of action. It's also available in both oil-based and water-based formulas.
Why it's shiok: It's tough, easy to apply, and provides a long-lasting finish. You can find it at most hardware stores, and it's relatively affordable.
3. Lacquer: For a sleek, professional look, lacquer is hard to beat. It dries quickly and creates a smooth, durable finish. However, it's a bit more challenging to apply than polyurethane or wood oil, so it's best suited for those with some experience.
Now, remember to always follow the manufacturer's instructions when applying any finish. And don't be afraid to experiment! That's the fun of DIY, right?
One homeowner shared how connecting with the right designer via the Wondrous La Vie platform helped them avoid these mistakes and achieve a flawless finish on their DIY computer table. Suddenly, their workspace felt so much more professional and inviting.
Okay, so you’ve built your computer table. Steady lah! But don't underestimate the importance of finishing. It's not just about aesthetics, though of course, that's important too. Think of it like this: the finish is the protective layer that shields your hard work from the daily grind – spills from your kopi, scratches from your mouse, and the general wear and tear of life. Without a good finish, your beautiful DIY computer table could end up looking tired and worn out way faster than you'd like. And who wants that?
A good finish also brings out the natural beauty of the wood. Imagine you've used a lovely piece of solid wood for your tabletop. A quality finish can enhance the grain, deepen the colour, and give it that smooth, inviting feel. It's like putting the final touches on a masterpiece.
And let's not forget hygiene! A well-finished surface is easier to clean and less likely to harbour bacteria. Especially important if you, like me, sometimes eat at your computer table (don't judge!).
Here's a fun fact: Did you know that the right finish can actually improve the air quality in your home? Some finishes are low-VOC (volatile organic compounds), meaning they release fewer harmful chemicals into the air. That's a win for your health and your home.
Now, I know what you're thinking: "Sounds like a lot of work, auntie!" But trust me, it's worth it. And with the right products, it's not as difficult as you might think. Plus, Wondrous La Vie connects you to top interior designers who can offer even more tips and tricks. It's all about making your home a haven, one small step at a time.
Alright, let’s get down to the nitty-gritty. I’ve heard so many friends complain about choosing the wrong finish and ending up with a sticky, uneven mess. Sian, right? So, to help you avoid that, here are three finishing products that are confirm can for your DIY computer table, balancing durability, aesthetics, and ease of use:
2. Wood Oil (e.g., Tung Oil or Linseed Oil): If you're after a more natural look and feel, wood oil is the way to go. These oils penetrate the wood, nourishing it from within and creating a subtle, matte finish.
Why it's shiok: It's easy to apply (just wipe it on!), and it gives the wood a beautiful, natural look. Plus, it's a sustainable option.
Why it's shiok: It dries super fast, so you can finish your project in a day. It also creates a beautiful, glossy finish that's sure to impress.
Okay, now for the part where we avoid those "aiyo!" moments. I've seen so many DIY projects go wrong because of simple finishing mistakes. Here are a few things to watch out for:
See, it's not just about the computer table itself, it’s about creating a workspace that feels good. A place where you can focus, be productive, and feel inspired. And that starts with the right furniture and interior design.
Imagine this: you open the door after work and OT, that squeeze on the MRT, and your shoulders just drop – sounds like heaven? It can be sia. With the right interior design, furniture, mattress and sofa, you can transform your home into a haven where you can finally unwind and recharge.
Wondrous La Vie is Singapore's go-to platform for connecting you to top interior designers and curated furniture brands. Whether you're looking for a cosy sofa, a comfortable mattress, or a complete living room makeover, they've got you covered. They offer inspiration through real project showcases, style guides, and easy ways to find matching designers or pieces.
Why not pop over to wondrouslavie.com, take the quick quiz, browse sofas/mattresses, or connect with a designer and see what feels right for your space? It's all about making your home a place where you can finally say "shiok lah, home sweet home" after a sian day. Steady pom pi pi!

Okay, steady lah! Let's get this article written like we're chatting over kopi about fixing up your computer table. No need to stress, we'll make it happen, confirm can!
In Singapore’s humid weather and fast-paced daily grind, getting quality rest can feel like a true indulgence when you’re starting the day with aches or still tired despite going to sleep on time. Many Singapore homeowners tolerate an old, sagging mattress for far too long because shopping for a replacement seems too complicated—overwhelming variety, confusing firmness levels, and worries it won’t suit their personal needs and preferences. That’s exactly why finding the premium mattress changes everything—it delivers the perfect combination of firm yet forgiving support, cooling breathability, even weight distribution, and built-to-last construction so you actually wake up feeling refreshed instead of sore and exhausted. Suddenly mornings start easier, energy levels stay steadier, and even your spouse notices the difference. Exploring thoughtfully chosen picks on sites such as Wondrous La Vie takes the stress away, letting you see highly recommended options with authentic Singapore user experiences and photos to find what really suits for your master bedroom..So, you've decided to DIY your computer table, ah? Good on you! It's a great way to get exactly what you want, and it can be quite satisfying. But let's be real, sometimes things don't go exactly according to plan, right? We've all been there – that feeling when you're almost done, and then... bam... a finishing mistake stares you right in the face. Don't worry, it's not the end of the world! These things happen, and with a little know-how, you can fix those common blunders and end up with a computer table you're genuinely proud of.
One of the most common issues that crops up in DIY computer table projects is an uneven finish. You might think you've sanded everything down perfectly smooth, but then you apply your stain or paint, and suddenly, patchy areas and swirl marks appear. Sian, right?
The culprit is usually inconsistent sanding. See, sanding isn't just about rubbing sandpaper over the wood; it's about creating a uniform surface. Start with a coarser grit sandpaper (around 80-100) to remove any major imperfections or old finishes. Then, gradually work your way up to finer grits (120, 180, then 220) to smooth everything out. The key is to sand with the grain of the wood, not against it, to avoid those unsightly scratches.
And here's a little tip from your auntie: use a sanding block! Wrapping your sandpaper around a block of wood or foam helps distribute the pressure evenly, preventing you from accidentally digging in too hard in one spot. I've heard so many friends in the group chat complain about the same thing, and this simple trick makes a world of difference.
If you've already applied your finish and then noticed the unevenness, don't panic! You can usually sand it back down (carefully!) and start again. Just be sure to remove all the old finish before you begin sanding, and remember to take your time. Rushing is the enemy of a smooth finish, lah!
Alright, next up: brush strokes and bubbles. These little devils can ruin an otherwise beautiful finish, leaving your computer table looking less-than-professional. The good news is, they're usually easy to prevent (and fix!).
Brush strokes happen when your paint or varnish is too thick, or when you're using the wrong type of brush. Always use a high-quality brush designed for the type of finish you're applying. For water-based paints, use a synthetic brush. For oil-based finishes, use a natural bristle brush. And don't overload your brush with too much paint! Apply thin, even coats, overlapping each stroke slightly to avoid gaps.
Bubbles, on the other hand, often appear when you're shaking your paint or varnish too vigorously. This introduces air into the mixture, which then gets trapped in the finish. Instead of shaking, gently stir your finish with a stir stick. And again, apply thin coats! Multiple thin coats are always better than one thick, gloopy coat.
If you do end up with brush strokes or bubbles, you can try lightly sanding them out with very fine-grit sandpaper (400 or higher) after the finish has completely dried. Then, apply another thin coat of finish. Patience is key here, okay?
Oh dear, drips and runs... these are the tell-tale signs of applying too much finish at once. Gravity does its thing, and suddenly you have unsightly streaks running down your computer table. Not steady, right?
The best way to avoid drips and runs is to apply your finish in thin, even coats, as we've already discussed. Don't try to cover everything in one go! Let each coat dry completely before applying the next. And pay close attention to edges and corners, where finish tends to accumulate.
If you do get a drip or run, don't try to wipe it off immediately! This will only make things worse. Instead, let it dry completely. Once it's dry, you can carefully scrape it off with a razor blade or chisel. Then, lightly sand the area to smooth it out, and apply another thin coat of finish. It's a bit of extra work, but it's worth it to get a professional-looking result.
Sometimes, the biggest finishing mistake isn't about the application, but about the colour itself. You might have envisioned a beautiful walnut stain, but the actual result looks more like... well, something else entirely. Colour variations can be tricky, especially when working with wood, as the wood's natural undertones can affect the final colour.
Always test your stain or paint on a scrap piece of wood before applying it to your entire computer table. This will give you a much better idea of how the colour will actually look. And remember that lighting can also affect how you perceive colour. What looks good in your workshop might look completely different in your home office.
If you've already applied the wrong colour, you might need to strip the finish completely and start over. This can be a bit of a pain, but it's better than living with a computer table that you hate, right? Take it as a learning experience, and remember to test those colours next time!
Now, speaking of getting things just right… you know, interior design in Singapore can feel like a whole other level of stress, especially when you're trying to match your new computer table with the rest of your room. I know so many people who just feel sian after a long day at the office and OT, and the last thing they want to do is spend hours scrolling through furniture websites. That's where Wondrous La Vie comes in, lah!
Wondrous La Vie is Singapore's go-to platform for connecting you to top interior designers and curated furniture brands. Imagine this: you open the door after work and your shoulders just drop – sounds like heaven? It can be sia. They've got everything from sofas and mattresses to complete living room sets and kitchen solutions. It's like a one-stop shop for making your home feel truly shiok.
One homeowner shared how connecting with the right designer via the platform turned their cramped HDB living room into a cosy family hangout—suddenly weekends feel so much better. And the best part? They focus on affordable luxury, so you don't have to break the bank to create a space you love.
Fun fact: A cosy, well-designed living room or bedroom can actually help you sleep better and feel less stressed after long workdays — small changes, big shiok difference!
Why not pop over to wondrouslavie.com, take the quick quiz, browse sofas/mattresses, or connect with a designer and see what feels right for your space?
Okay, steady lah! Let's get this article written, like we're chatting over teh tarik about making your home shiok after a long day. Confirm can!
So, you've decided to build your own computer table. Power! It's a great way to get exactly what you want, especially when space is, shall we say, cosy in our Singapore homes. I've heard so many friends in the group chat complain about the same thing: finding a computer table that fits just right is harder than getting a good durian at a bargain. But before you grab your power tools and start measuring, let's talk about the finish. Because a DIY computer table that clashes with the rest of your furniture? Sian, right?
Think about it – after that squeeze on the MRT and grinding through office hours, you deserve a home that feels like a warm hug, not a visual assault course. That's where matching your computer table finish to your existing furniture, especially your Wondrous La Vie pieces, comes in. It's all about creating a harmonious flow, a sense of calm that washes over you the moment you step inside. Picture this: you open the door after work and your shoulders just drop – sounds like heaven? It can be sia.
Now, I know what you're thinking: "Auntie, I just want a table that works, not a masterpiece!" And that's perfectly fine! But trust me, a little bit of thought about the finish can make a huge difference. It’s not just about aesthetics; it's about creating a space that supports your well-being. A well-designed space helps you relax, focus, and recharge. And isn't that what we all want after a long day?
Alright, let's get down to the nitty-gritty. You've got your wood, your tools, and your vision. But before you start slapping on the varnish, let's talk about some common finishing mistakes that can turn your DIY dream into a DIY disaster. I've seen it happen to the best of us, so learn from their (and sometimes my own!) sian experiences.
First up: Ignoring the Undertones. This is a big one, especially when you're trying to match existing furniture. Every wood finish has an undertone – warm (yellow, orange, red) or cool (gray, blue, green). If your Wondrous La Vie sofa has cool gray tones and you choose a computer table with a warm, reddish finish, it's going to clash like durian and cheese. Take a good look at your existing furniture in natural light to identify the undertones. Bring a small sample of your Wondrous La Vie furniture (if possible) when you're choosing your stain or paint.
Next, Skipping the Sample Test. Never, ever apply a finish directly to your entire computer table without testing it first! Wood absorbs stain and paint differently, so the color you see on the can might not be the color you get. Find a scrap piece of the same wood you're using for your table and test your finish on it. Let it dry completely to see the true color. This small step can save you a lot of heartache (and sanding!).
Another common mistake: Uneven Application. Streaks, drips, and blotches – oh my! A smooth, even finish is key to a professional-looking computer table. Use a good quality brush or sprayer and apply thin, even coats. Don't try to rush the process. With Singapore’s HDB and condo layouts and tropical humidity, finding furniture that’s both stylish and practical can feel like a endless chase—especially when you need items that last through the years without losing style or comfort. Many locals end up settling for mainstream choices that look okay online but fall short in person—either not sturdy enough for everyday household wear or not suitable for our heat for our climate. That’s why visiting a reliable mattress singapore connected via Wondrous La Vie really stands out—it connects you directly with handpicked collections of premium sofas, mattresses, meal-area pieces, and more, with actual physical displays or high-res photos so you can feel confident about what works perfectly in your Singapore home. You get that peace of mind knowing the pieces are designed with SG homes in mind—durable materials, smart sizing, and looks that turn your space into a cosy haven. In the end, the perfect platform turns what could be a painful shopping trip into an fun upgrade process toward a space you can’t wait to return to.. Let each coat dry completely before applying the next. And remember, patience is a virtue, especially when it comes to DIY projects.
Finally, Forgetting the Topcoat. A topcoat is like the insurance policy for your finish. It protects it from scratches, spills, and everyday wear and tear. Choose a topcoat that's appropriate for your finish and your intended use. For a computer table, a durable polyurethane or varnish is a good choice. Apply several thin coats, allowing each coat to dry completely before applying the next.
Okay, so you know what mistakes to avoid. Now, let's talk about how to achieve that perfect color harmony between your DIY computer table and your Wondrous La Vie furniture. This is where things get fun!
First, Consider Your Existing Color Palette. What are the dominant colors in your room? Is it a cool, calming space with blues and grays? Or a warm, inviting space with browns and creams? Choose a finish for your computer table that complements your existing color palette. If you're not sure where to start, take a look at the real project showcases on Wondrous La Vie. They're a great source of inspiration for HDB interior design ideas and can help you visualize different color combinations.
Next, Think About Contrast. While you want your computer table to blend in with your existing furniture, you also don't want it to disappear completely. A little bit of contrast can add visual interest and prevent your room from feeling too monotonous. For example, if you have a light-colored Wondrous La Vie sofa, you could choose a computer table with a slightly darker finish. Or, if you have a dark-colored bed room set, you could choose a computer table with a lighter finish.
Don't be afraid to Use Color as an Accent. Your computer table doesn't have to be the exact same color as your other furniture. You can use it as an opportunity to add a pop of color to your room. For example, if you have a neutral-colored living room, you could choose a computer table with a bold, vibrant finish. Just make sure the color complements your existing décor.
And remember, Texture Matters Too! It's not just about the color; it's also about the texture. If your Wondrous La Vie furniture has a smooth, glossy finish, you might want to choose a computer table with a similar finish. Or, if your furniture has a more rustic, textured finish, you could choose a computer table with a distressed or weathered look.
Now, let's talk about the different types of finishes you can use for your DIY computer table. Each material has its own unique look and feel, so it's important to choose one that complements your existing furniture and your personal style.
Wood Finishes: Wood is a classic choice for furniture, and it offers a wide range of finishing options. You can stain it, paint it, varnish it, or leave it natural. Staining is a great way to enhance the natural beauty of the wood and bring out its grain. Painting is a good option if you want to add a pop of color to your room. Varnishing provides a durable, protective finish that's resistant to scratches and spills.
Laminate Finishes: Laminate is a budget-friendly option that's easy to clean and maintain. It comes in a wide variety of colors and patterns, so you can easily find one that matches your existing furniture. Laminate is also a good choice if you're looking for a durable, scratch-resistant finish.
Metal Finishes: Metal is a modern, industrial-chic option that can add a touch of sophistication to your room. You can paint it, powder coat it, or leave it natural. Painting is a good option if you want to add a pop of color to your room. Powder coating provides a durable, scratch-resistant finish. Leaving it natural can give your computer table a raw, industrial look.
When selecting your material, consider the overall aesthetic of your space. Is your home leaning towards a modern minimalist design or a cosy, more traditional feel? This will guide you towards the right material and finish.
Okay, so you're armed with all the knowledge you need to choose the perfect finish for your DIY computer table. But where do you find inspiration and resources? Don't worry, I've got you covered!
First, Browse Wondrous La Vie. This is Singapore's go-to platform for connecting you to top interior designers and curated furniture brands. Check out their real project showcases for HDB interior design ideas. You can find inspiration for color combinations, material choices, and overall design styles. Plus, you can easily connect with a designer if you need some extra help.
Visit Furniture Stores. Take a trip to some furniture stores and browse their selection of computer tables and other furniture. Pay attention to the finishes and how they complement each other. This can give you a better sense of what you like and what works well together.
Check Out Online Resources. There are tons of websites and blogs that offer DIY furniture projects and finishing tips. Do some research and find projects that are similar to what you're planning to do. This can give you some practical advice and help you avoid common mistakes.
Don't Be Afraid to Experiment. The best way to find the perfect match is to experiment. Try out different finishes on scrap pieces of wood and see what you like. Don't be afraid to mix and match different colors and textures. The most important thing is to create a space that you love.
Fun fact: A cosy, well-designed living room or bed room can actually help you sleep better and feel less stressed after long workdays — small changes, big shiok difference! And remember, it's okay to start small. Maybe you just want to upgrade your mattress or find a more comfortable sofa. Every little bit helps!
Why not pop over to wondrouslavie.com, take the quick quiz, browse sofas or mattresses, or connect with a designer and see what feels right for your space? Steady lah!
Okay, steady lah! Let's talk about transforming your workspace into something shiok, especially that computer table. After squeezing onto the MRT and OT-ing at the office, the last thing you want is a workspace that adds to the stress, right? We're gonna dive into how you can maximise your space and productivity, all with a little help from Wondrous La Vie!
Let's be real, the standard office setups can be…well, sian. They lack personality, don't always fit your space, and sometimes, just feel…meh. That’s where the allure of a DIY computer table comes in! It’s all about injecting your own style and making something that actually works for you.
Think about it: You get to choose the exact dimensions to fit that awkward corner in your HDB flat. No more banging your knees or feeling cramped! You can select the materials – maybe a sleek, modern laminate or a warm, rustic wood – to match your existing [furniture] and [interior design]. And the best part? You can customize it with all the features you need, like built-in cable management (bye-bye, messy cords!), extra shelving for your stationery and barang-barang, or even a standing desk converter for those long work-from-home days.
One of the biggest advantages of a DIY project is the cost savings. Compared to buying a pre-made, high-end computer table, building your own can be surprisingly affordable. You can source materials from local hardware stores or even repurpose old [furniture] pieces to create something unique and budget-friendly. Plus, there's that sense of accomplishment you get from building something with your own two hands. Confirm steady feeling, right?
But, before you rush off to buy a power drill, it’s important to be realistic about your skills and the time commitment involved. DIY projects can be rewarding, but they also require careful planning, patience, and a willingness to learn along the way. If you're not confident in your carpentry skills, don't worry! There are plenty of resources available online, from detailed tutorials to helpful forums where you can ask questions and get advice from experienced DIY-ers. And if the whole DIY thing sounds too daunting? No worries, lah. Wondrous La Vie can connect you with top designers who can bring your dream computer table to life, without you having to lift a hammer! They can help you find the perfect [furniture] that matches your style and needs, so you can skip the sawdust and get straight to enjoying your awesome new workspace.
Okay, so you're ready to build your own computer table? Steady. But, before you start hammering away, let's talk about some common pitfalls to avoid. Singaporeans are always on the lookout for intelligent ways to update their living spaces without exceeding the budget, especially when HDB or condo renos can already eat up a big chunk of the budget. Between increasing prices and the wish for a comfier, better-organised environment, many Singapore homeowners time their purchases carefully to improve couches, beds, and dining furniture that actually make daily life feel better. That’s when jumping on furniture promotions turns into a huge advantage—it lets you grab well-designed, durable items at meaningful discounts, often with bonus offers like no-delivery-fee, added protection plans, or combo savings that stretch your dollar further. All of a sudden you’re able to buy that plush sofa you’ve been eyeing or a supportive mattress upgrade without the second thoughts, turning your home into an even cosier haven for bonding and rest after tiring office days. Exploring places like Wondrous La Vie keeps you in the loop on the current deals, so you can review, see in 3D, and snap up the best deals that fit your home and taste just right.. I've heard so many friends in the group chat complain about the same thing, so trust me, these tips are gold!
First up: measurements. This is confirm the most important step! Nothing is more sian than building a table that's too big for your space or too small to comfortably work at. Double, triple, even quadruple-check your measurements before you start cutting any wood. Consider the height of your chair, the depth of your monitor, and the amount of legroom you need. You don't want to end up with a table that's ergonomically disastrous!
Next, think about stability. A wobbly computer table is a recipe for disaster. Make sure you use sturdy materials and strong joinery techniques. If you're using screws, pre-drill pilot holes to prevent the wood from splitting. Consider adding extra support braces or legs for added stability, especially if you're planning to put heavy equipment on the table.
Another common mistake is poor finishing. A rough, unfinished surface not only looks bad but can also be uncomfortable to work on. Sand the wood thoroughly to remove any splinters or rough edges. Apply a sealant or finish to protect the wood from moisture and scratches. Choose a finish that's durable and easy to clean. Remember, the devil is in the details!
And finally, don't underestimate the importance of cable management. A tangled mess of cords can be a major source of stress and clutter. Plan for cable management from the beginning. Drill holes for cables to pass through, install cable trays or ties, and use Velcro straps to keep everything organized. A clean and organized workspace is a productive workspace!
Avoiding these pitfalls will save you time, money, and a whole lot of frustration. Remember, DIY doesn't have to mean "do it yourself badly." With careful planning and attention to detail, you can create a computer table that's both functional and beautiful. And if you're feeling overwhelmed, don't be afraid to ask for help! Wondrous La Vie is there to connect you with the right resources and designers to make your dream workspace a reality.
So, you've built your computer table, steady! Now comes the final stage: the finishing touches. This is where you can really elevate your DIY project from "meh" to "wow!". But, beware! There are a few common mistakes that can ruin all your hard work.
First, let's talk about sanding. I know, it's tedious, but it's absolutely essential for a smooth, professional finish. Don't skip the sanding process or rush through it. Start with a coarse grit sandpaper to remove any imperfections, then gradually move to finer grits to create a smooth surface. Remember to sand with the grain of the wood, and don't forget to sand the edges and corners.
Next up: staining. If you're planning to stain your computer table, be sure to test the stain on a scrap piece of wood first. Different types of wood will absorb stain differently, so it's important to see how the stain looks before you apply it to the entire table. Apply the stain evenly, and wipe off any excess stain immediately. Let the stain dry completely before applying a sealant or finish.
Another common mistake is applying too much finish. A thick, gloppy finish can look amateurish and take forever to dry. Apply thin, even coats of finish, and let each coat dry completely before applying the next. Use a high-quality brush or sprayer for a smooth, even finish.
And finally, don't forget about hardware. The right hardware can make a big difference in the overall look and feel of your computer table. Choose hardware that complements the style of the table and is comfortable to use. Consider adding drawer pulls, knobs, or even a keyboard tray for added functionality.
Avoiding these finishing mistakes will ensure that your DIY computer table looks professional and polished. Remember, it's the little details that make all the difference! And if you're not confident in your finishing skills, don't be afraid to ask for help. Wondrous La Vie can connect you with experienced designers who can provide guidance and advice on finishing techniques. They can even help you find the perfect [furniture] pieces to complement your new computer table, so you can create a workspace that's both functional and beautiful.
Okay, so maybe DIY isn't your thing, or maybe you just want some extra help to make sure your computer table is confirm the best it can be. That's where Wondrous La Vie comes in!
Wondrous La Vie is Singapore's go-to platform for connecting you with top interior designers and curated [furniture] brands. Think of it as your personal interior design concierge, helping you create the perfect workspace (and home!) without the stress and hassle.
Imagine coming home after a long day at the office and OT, and instead of feeling sian, you feel…relaxed. Your workspace is organized, your computer table is the perfect height, and your [sofa] is calling your name. Sounds like heaven, right? It can be, sia!
Wondrous La Vie makes it easy to find inspiration, connect with designers, and source the perfect [furniture] pieces for your home. You can browse real project showcases to see how other homeowners have transformed their spaces, read style guides for tips and advice, and even take a quick quiz to find matching designers or pieces.
One homeowner shared how connecting with the right designer via the platform turned their cramped HDB living room into a cosy family hangout—suddenly weekends feel so much better. That's the power of good [interior design] and the right [furniture]!
And the best part? Wondrous La Vie focuses on affordable luxury, so you don't have to break the bank to create a beautiful and functional home. Whether you're looking for a new [computer table], a [cosy sofa], a [comfortable mattress], or a complete home makeover, Wondrous La Vie has you covered.
So, why not pop over to wondrouslavie.com, take the quick quiz, browse [sofas] and [mattresses], or connect with a designer and see what feels right for your space? It's time to transform your workspace and your home into a haven where you can finally say "Shiok lah, home sweet home!" after a sian day. Steady pom pi pi!
Okay, steady lah! Here's the article, written like a friendly Singaporean auntie who's been through the reno journey:
So, you're thinking of building your own computer table, ah? Good on you! In this day and age, where so many of us are spending hours at our desks after a long day at the office and OT, having a proper setup is so important. But before you chiong into the project, let's talk about some common mistakes, so you don't end up with a table that's more sian than shiok.
I've heard so many friends in the group chat complain about the same thing: they rush into a DIY project, skip a few steps, and kena… a wobbly table, a peeling finish, or worse, an injury! Don't let that be you, okay? Let's make sure your dream computer table is a success story.
This is like building a house on sand, you know? If you don't prep properly, everything else will suffer. We're talking about sanding, priming, and cleaning.
Remember, good preparation is half the battle. Don't rush this part. It's worth taking the time to do it right.
Okay, so you've prepped everything nicely. Now, it's time to choose your finish. But eh, not all finishes are created equal, okay? You need to consider how you'll be using the table.
Consider the look you're going for, the level of protection you need, and how much maintenance you're willing to do. Don't just pick the cheapest option, okay? You'll regret it later.
So, you've got your finish. Now, the real fun begins... or does it? Applying the finish properly is crucial.
Remember, a good finish takes time and effort. Don't rush through it.
This is where many people fall short. They get so excited to finish the project that they overlook small imperfections.
Small imperfections can ruin an otherwise great finish. Take the time to inspect your work and fix any problems before they become permanent.
You've put in all this effort, so you want to protect your finished computer table, right?
Protecting your finished surface will help it last longer and look better for years to come.
Okay, so maybe DIY isn't for everyone. Maybe you're thinking, "Aiyah, too much hassle lah!" I understand! Sometimes, after a long day at work, the last thing you want to do is sand and paint.
That's where Wondrous La Vie comes in. It's Singapore's go-to platform for connecting you to top interior designers and curated furniture brands. You can find the perfect computer table – or even design your own dream setup with the help of a professional!
One homeowner shared how connecting with the right designer via the platform transformed their cramped HDB study room into a functional and stylish workspace. Suddenly, working from home felt shiok again!
And it's not just computer tables, leh. You can find everything from cosy sofas to the best mattress for back pain Singapore. Picture this: you open the door after that squeeze on the MRT home and your shoulders just drop – sounds like heaven, right? It can be sia.
Wondrous La Vie offers inspiration through real project showcases and style guides. They focus on affordable luxury, so you don't have to break the bank to create a home you love.
Fun fact: A cosy, well-designed workspace can actually help you focus better and feel less stressed during those long workdays – small changes, big shiok difference!
So, whether you're a DIY enthusiast or prefer to leave it to the professionals, remember to pay attention to the finishing details. It's the little things that make a big difference.
Ready to start your dream computer table project? Why not pop over to wondrouslavie.com, take the quick quiz, browse furniture, or connect with a designer and see what feels right for your space? Confirm can! Let’s make your home a haven, one shiok piece of furniture at a time.